Total Pageviews

Monday, November 12, 2012

A Huge catch up!!


Yes I know it has been over 6 months since my last post and having read other blogs I felt rather guilty in not letting you know what I have been up to.

Now this is not the place to tell you all the family and yard work guff so I will cut straight to the chase.

Yes the fellas did turn up and had a great time. This shot from Craig is what he saw when first walking in.

Awaiting the scenery but ready for action


What the layout was built for, the fellas running trains..
Photo courtesy of David Mewes

Well as I mentioned all those months ago, there was plenty of work being done between the other posts and photos. The back drops in stage one area needed a lick of paint and fellow Tuesday Nighter Peter is a wizz at painting them. I am ever so thankful to Peter.
Peter working his brushes and .....


The faint back scene drying


The trains needed somewhere to terminate and as I had started this section of track work I thought I might as well add some temporary runaround facilities.
This trackwork will be permanent with the left track heading to Wattle Flat and the right heading to hidden staging.


Overview with the permanent trackwork taking shape. The hidden staging is at the top of the photo.

This is the temporary benchwork knocked up to provide a runaround for the day. Thanks again to Craig for this shot as I never took any.

There was a great attendance and I enjoyed being grilled on the changes from 12 months earlier. There were plenty of trains run with the layout being put through its paces. The discussions, food and beer flowed freely and a good time was had by all.


Times rests for know one, the next day the temporary benchwork was removed and so was that temporary peco point motor powering the hidden staging siding. The wire in tube works far better.

Temporary benchwork gone and template mapping underway.


I cheated this time and the frame work is timber legs. It was a lot quicker and this section of the layout may not last if my wife wants to move!!!!


Cutting the timber to length. With the cutting list complete the project is moved out to the workshop for assembly, including the backdrop.


My annual leave got in the way of layout work but with any good family holiday I try to sneak in some rail fanning. My first chance was Barraba and I had been keen to see what was left after only getting as far as Manilla back in 2008.  Warren told me there was nothing much left so I guess Geoff and I didn't miss much back then, and yes he was spot on.

Barraba loading ramp. Photo taken from the raise loco area and station was to the right of shot. End of the line is to the left.

Roughly 3 km sth of town is the still tact silo area.


I took plenty of photos of "what" said the good wife and "are ya FINISHED".
 It was quite a few days before I tried it again and when Rylstone appeared I stopped for a few shots.
Station looking towards Mudgee


Looking to Kandos


Where is the station Ray!!!


 I am a member of the Merriwa Society and dropped in to see the restoration progress.


A quick couple of shots in Tamworth, the siding has been removed.


By this time I think I was starting to push my luck so as the car was already packed we made our way to the coast and sunny Port Macquarie. The plan was to spend a few days at the beach.

As we got closer to Port and it had been some time since my last rail stop I thought it safe to say "Oh, do you mind if I catch up with good mate while in town."

Leaving the family with the beach and pool within walking distance I took the chance and headed over the "Liverpool Range" and spent a every enjoyable afternoon with Ian Millard. I have known Ian for over 15 yrs and it was great to catch up, see his house and check out the layout progress.

The layout is coming along nicely and the quality of construction and trackwork is a real credit to him. His blog liverpoolrange.wordpress.com  is one to follow.

Many thanks again Ian for an inspirational afternoon.

The rest of my holidays had nothing further to do with railways until I got home.

Back in the railway room and fully inspired I started mapping out the trackwork.

Sorry can't turn this shot over. The plan here is a goods, stock, back platform and main.

Anyway I hope this long winded catch up fills you in.

This weekend is the New England Convention held in Armidale. It will be a great weekend and I hope to catch up with fellow bloggers. Come up and say Gday!!! See ya there.

Monday, May 14, 2012

Sh....... the fellas are coming!!!

Well it has been over 12months since the Tuesday nighters have been and seen first hand what is happening on "The Extension".
With that thought in mind and having had to cancel the last date, this gave me a bit of extra time to actually get a lot more work done.
As mentioned earlier I enjoy the construction side, so it was out with the tools and .....

Construction of the next peninsular. The backdrop is sandwiched between the framework to become self supporting. All that is left here is to bolt together.

The whole lot is then turned upside down and the pre-assembled, welded steel framed legs are then bolted on. The module is then turned back over and carried into the train room for final adjustment.

Here it is, a simple matter of attaching it to the existing benchwork and then adjust the height. All my legs have adjustable feet welded into the base. Yes I had to move the display layout module. It is now in the workshop awaiting its fate!!!!

The plan with this peninsular is for one side to become a junction station leading off into hidden staging  and the other side will just be the branch passing through the scene.


This shot hopefully gives you an idea of what I am trying to acheive!!!!! The track heading away in the photo is the hidden two track staging area and the track heading to bottom of picture continues on to "Wattle Flat".

This photo shows the missing link between the finished landscaping and the junction.


Doh, in the reverse order but the brown paper template gives you an idea of what I was planning. All the trackwork is just placed loosely to 'get the feel'.

I have more to show when I get the shots off the camera. I am not the sharpest tool in the shed. I look forward to the feed back from the fellas, come this Saturday.

Until then, bring on Tuesday night as we are heading over the Craig's place aka Cassino for a look at the current progress. I can't wait.

Until next time.

Tuesday, May 1, 2012

Moree Adventures

Yes the week-end of the 21st and 22nd seem a distant memory so I thought I'd have a look at the shots and fun Geoff, Brendan and I had, and share a bit with you.

Here is a current shot of Moree station, and it is served daily with a passenger service to Sydney.

We left Queensland with plenty of time and the intention was to take in some railway sights along the way. Although we travelled along the QR line to Goondiwindi there was nothing to see until we crossed the border and arrived at Boggabilla. Sadly the roof has been removed, no doubt due to asbestos.

The end of the line for the Boggabilla branch which left the junction station of Camurra. Sadly the end of the line is now North Star and all grain is railed from this point.

Infrastructure is still mostly in place. The above loading bank is currently a road access to the local fuel agent. This shot is taken on the platform with the station  behind. The end of the line is to the right of shot.


This shot is also taken from the platform and is looking towards Camurra. The yard crane is complete and silos are to the left of shot.


Peter Boorman makes a nice etched brass kit. The station is to left of shot and silos to the right.


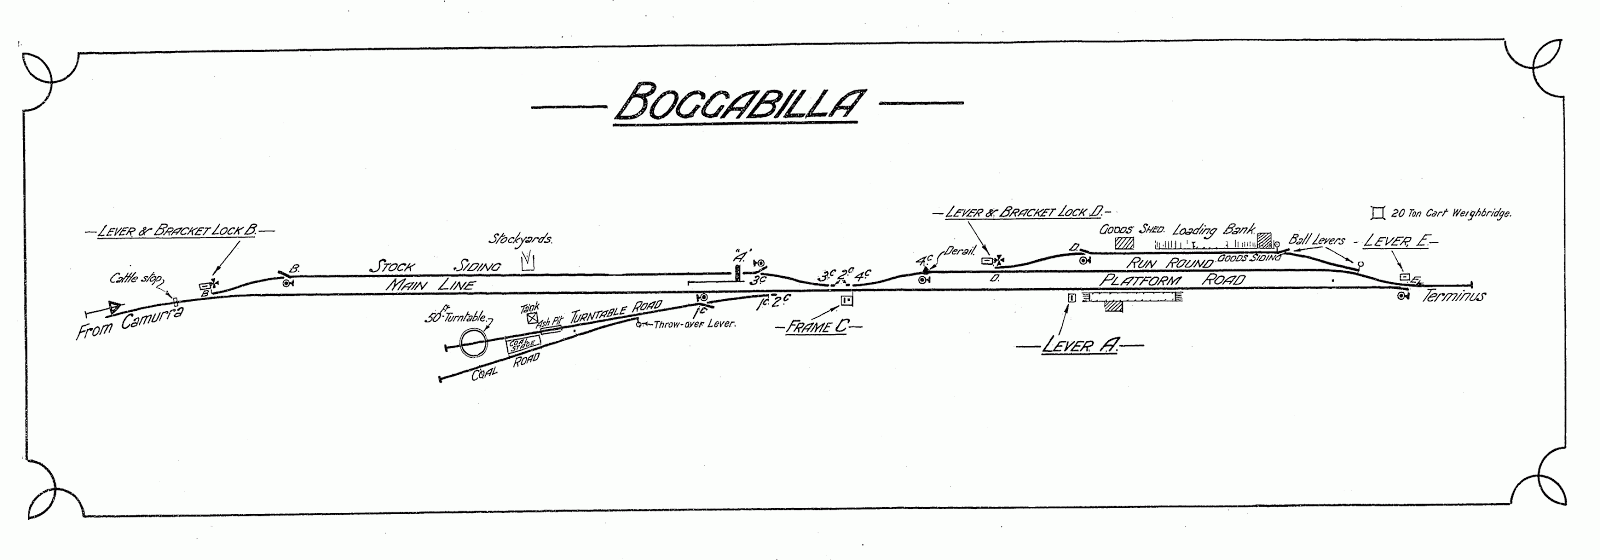
Here is a line drawing I dug up from some paperwork I got from a old driver that he had in his "appendix". I assume it would have been in the signal box. Sorry unsure of a date but it was in the 1943 issue I was given.

Here are a couple of shots I took back in 1997. All was in place back then and the grass was a lot shorter.


Another of the rear from 1997. I wish I had taken more shots.


The last shot from 1997 is looking south. The large silos facility can be seen in the background.


We left Boggabilla and casually made our way to Moree and the show venue. All the greeting taken care of and it was time to set up the layout. There are some great characters in this hobby and I really enjoy catching up with them.


We had a great spot and the layout went together well. There were more trains than places for them but it made for great variety over the weekend.
There were excellent layouts on hand and as with all country shows plenty of time to catch up with everyone, learn a new trick or two and spend money.

The interation with the public is amazing at the country shows because so many tell you yarns from "way back when". I always make time to listen. One gentleman had travelled up from Manilla and was telling me a story when I mention that Geoff and I had been through photographing the railway infrastructure. He informed me that the Goods Shed had burned down recently.

Here is one of the many shots we took in 2008. That is Geoff on the platform amongst the Cobblers Pegs!!!!!!!

Manilla lost there Railway Refreshment Rooms in a fire in 2006 and now the Goods Shed has gone. The gentleman also advised the bridge to Barraba is not far from going as well. I have some great shots of this too, but arr for another post.

Anyway, where was I, arr that's right.... With the show over and all packed up we headed to the Albert Motel for our last night.

Monday morning dawned and after checking out we made our way to the railway yards in Moree for a poke around.


Here is a 1971 diagram I was given a copy of and can be used to assist with the photos I took of some hidden treasures.


Here is a current day shot looking north to Camurra. I'll let you decide if much has changed.


From the other end of the platform looking south. I am unsure if this is the same fuel agent listed in the diagram however on inspecting the compound it appears to be so.


After inspecting the fuel agent siding we headed down to the old silo siding and found some real treasures. The line diagram answers the questions we asked ourselves that day.


Where the cars are parked under the awning is the siding and loading scales with all still intact!!!!


Who would have thought some 40 years later the rails and scales would still be intact.


Looks to me like a bagged wheat loader. This find was also in the same yard.

Times sure flys when your having fun and with it now being mid morning it was time to hit the road and head for home.
It will be interesting to see what happens to this area as the Moree bypass is currently heading in this direction. Who knows what will remain???

I have to say thankyou to the organisers for a great show with plenty of good old country hospitality. A big thanks to Geoff and Brendan for great company with plenty of laughs and for inviting me. I have to behave myself as he has his own car now, with a towbar!!!

This weekend is the Brisbane Model Train Show at the RNA show grounds so I must sign off and get my shopping list together.   Until next time.

Sunday, April 15, 2012

The stage is set for benchwork to begin......

Having reached the milestone I mentioned last post, I have not rested, other than the occiasional train running.


While finishing off the remainder of the paper towel and glue I was also working on how I was going to dress the front of the layout and hide the mess that is usually under a layout. I needed the curtain to also follow the facia and not gape in places on its trip around the facia.


the end product before scenery and facia painting


I needed the services of an expert, and trusty old mum came to the rescue and sowed the curtains for me. The secret is that she sowed a (rod pocket ) along the top and then hemmed the bottom.

The other part of the secret is I used 16mm conduit as a curtain rail running on the inside of the facia all the way around. This rod is supported by hooks that fix to the facia supports and the curtain is notched out where there is a hook. Each curtain is about 3m long and I think will do the trick nicely. Great work mum.


Well I was right, the tools were calling and that means benchwork extensions. My preferred method is to construct the frames acouple at a time, this speeds assembly as they are all cut out on my benchsaw at once.


70 by 19 screwed and glued


I have mentioned else where the steel leg construction method. I also cut and assemble these in advance to save time.

Then the assembled 2400 by 400 module complete with attached backdrop is shifted from the workshop into the layout room.


shifted into placed, bolted then level


The same process takes place again ......


both modules are in place with storage shelving underneath, there is another peninsular to be built and it will go where the current module of my ex display layout is!!!


My ex display layout 'More' is starting to really get in the way as can be seen by the above shot. This was the first module built back in 1999 on the floor of my shed and was first exhibited in May 2000, I guess it brings back some great memories........., but I digress.

I tend to get a bit carried away at times with, to far forward planning and this shows in the below photo. This is the last station modelled on the 'branch' and will be loosely based on Nimmitabel. Apart from the curving away to the left I will be able to replicate the track plan entirely.

Heading north from here will head into staging.


paper templates make marking out and planning so much easier


While keeping myself busy with all the above I offered, back in October last year to make a 'train control' dispatcher panel for Craig aka Ca55ino. It has been over 10 years since I made the last one for the Logan Model Railway club and now I remember why.

Thanks must go to my wife for her assistance in the finishing stages as without her I would be cross eyed.


thankfully Mr XXXX assisted as well


This weekend I will be assisting Geoff with his acclaimed "Splitters Swamp Creek" at Moree 150 year celebrations. If you are in the area, drop in and say hello. Geoff, Brendan and myself will be more than happy to have a chat.


Until next time.

Sunday, March 4, 2012

Finishing stage one in construction

Planning a large project, like building a home layout, I decided in the early stages that I would break construction of the layout up into milestones.

Stage one was to construct what you have seen so far with the intention of moving on to stage two when all parts of construction were complete, bar scenery.

Trains have been running well so I need to lock them away and move on to finishing landscaping and facia work.


facia supports in place


As I have said before, I want the facia to flow and I have had to do some pre planning so as to meet my objective.

The roadbed and facia need to be in place and then profiled. I can then insert and shape the foam to suit.


this is the end of stage one


Like I mentioned before, the timber work is no problems but cutting and shaping the foam is just........

is this what they mean by square pegs in round holes.....


All jobs do come to an end and I am quite happy with the results. At this point I can see where building placement will be.


now to scratchbuild the industry


Having a large amount of foam sitting around has been a great help. If I had found a 'Round 2 it' earlier, it would have been an even greater help.


the last of the foam installed and shaped, whoooo....


With all the foam installed, cut and shaped it was time to bring out the vaccum cleaner and clean up. It was a bigger job than I thought as the little white balls went everywhere and through everything.


One big job out of the way and onto another. Yes the hole lot had to be covered in paper towel soaked in PVA glue, whoooo...


This is where having a carpeted and with storage shelves already in place underneath train room becomes a pain in the proverable. Yes that's right I had to move everything and place dropsheets on the floor.


Sorry no pictures, you will have to believe me that glue seeps through everywhere!!!!!!


the end, stage one...


Well the last photo proves it I made it, all the foam is covered and ready for scenery.


Backdrop painting will come first before scenery so if you are handy with a brush, look out.


With the weather having been in my favour the last few weekends and the Good Wife busy I have been able to finally get a good wriggle on.


I feel the power tools are calling me ....................

....................until next time.

Wednesday, January 25, 2012

Still making a mess but...

Having finally finished carving the white foam on the other side, it was time to clean that up a bit and make a serious start on the other side of the backdrop, in other words, to make a different kind of mess.
Constructing the facia does make a mess but one that I can get my head around and that does not get little white balls "EVERYWHERE".

Although the crossing loop and goods siding have been in for over 12 months, I was not totally sure what industry or scenry feature would occupy the "return".

For any of you who have done any type of research into branchline timetables and the number of trains that might run in any typical week will find out that not many actually run at all. Even the busiest of branchlines may have run 2 trains per day everyday of the week!!!!!.

The reason for the construction of this layout is for the purpose of operation, therefore I needed to make more trains, but at the same time make a reason for there passage. To do this I need to incorporate believable industries that are served by rail.

Introduce the newist industry (it does not have a name yet) but will be a manfacturing and wholesale company. Raw products in and processed into products that are railed out, you get the idea.


trackwork loosely in place ready for the building to be constructed


This "customer" will be the main stay of the branch along with the other industries normally served by a mixed goods or branch line consist.

Anyway enough of my justification, having sorted that out I was able to continue the facia around to the end of the station area.

marking out where the supports need to go


Wanting the facia to follow the line and flow as one means a bit of planning and mapping out where the supports will go.

This facia will support plug in points for throttles, throttle holders, wagon and consist boxes and operators who persist in leaning up against the layout, so it needs to have some strength to it.

marking holes for the turnout activating rods


31 x 11 pine is simple but effective, please don't start counting how many screws I've used


what is should look like, ready for profiling


another view looking towards the new industry


At this point the facia is very firm and ready for any last minute profiling, below track cuttings. All that is left now is to fill in all the voids with the foam and carve the profiles to suit. More white balls, ahhhhhh.


I then need to install the dowel to the end of the rods for the point activation, next time anyway.


Here's to a good year of modelling.